Showing posts with label fashion. Show all posts

Saturday, December 29, 2012

Galaxy Outfit! Yep or Nope?

As a new bud measuring fun & curiosity in the early 2012, The Galaxy trend has been going on for a while, and is still on pretty strong. It is that easy as the galaxy prints can easily touch up your heart just by feeling the extraterrestrial joys in life.
I always saw some stylists styled with galaxy prints. They are so beyond beautiful and awesome, I just can't held breath it. There is no doubt that  how much I adore galaxy, it is mysterious, stunning and super eye-catching.
Have your already chosen any galaxy products for your wardrobe? if no, why not give a try?


Monday, October 15, 2012

DIY Gold Tube Bracelets

(Souce: http://honestlywtf.com/diy/diy-gold-tube-bracelets/)
This tutorial will show you how to make two delightful bracelets using the same basic component. Get inspired and have fun!

For single, adjustable gold tube bracelets, you’ll need:

Start by cutting the knotting cord into 2 12 inch pieces. Thread a gold noodle tube bead through one of the strands and cross the ends.
And now, all that’s left is the sliding closure! Similar to our macrame bracelet, fold the 2nd strand over the overlapping ends and start tying square knots. Fold the top cord over the bottom cord . . .
. . . and bring the top cord under both the bottom and middle overlapping strands through the loop, into a knot.
Repeat the same step on the right side.
Continue to make 5-6 more knots.
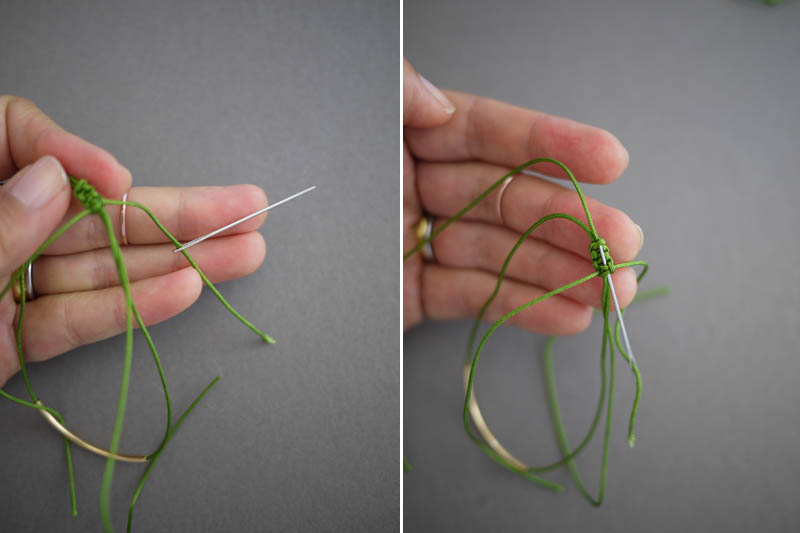
To finish the knots, thread one of the cords onto a needle and sew up the center of 2-3 knots along the backside. Pliers will help pull the needle through the tight knots.
Trim away any excess cord.
Thread two gold spacer beads onto each cord and tie the tips into a knot. Trim.
Your adjustable & colorful bracelets are done!

For a leather wrap gold tube bracelet, you’ll need:

Insert one end of the leather cord into the crimp on cord end. Take a pair of chainnose pliers and squeeze the middle of the end cap to secure the leather cord.
Thread on 7-8 gold noodle tube beads.
Wrap the bracelet around the wrist to gauge the proper length. Trim and crimp on the second end cap.
Using the pliers, open the jump ring connected to the clasp and connect it to one of the end caps.
Wrap, close and your bracelet is complete!
Layer and enjoy.

Sunday, August 26, 2012

Geometric Style, Chic and Unique!

Often, fashion embraces sharp edges and architectural, origami-like shapes, and these are translated into geometric accessories and apparel. Geometry in jewelry always lives up to its name – it boasts simplicity, it’s neat yet eye-catching and, in many cases, geometric jewelry could be the making of an outfit. Right now, geometry within jewelry design is seeing a personality shift.
While fashions do come and go, geometry seems to be a prevailing element that enters and stays from fashion season to season. Modern, funky and surely different, geometry elements will definitely make you a stand out in any room you walk into.


$5.99 Blocking Bib Necklace Black & Orange

Saturday, July 28, 2012

Let Your iPhone Cases be Unique

Sometimes, we shop online jewelry shop and find received product broken, don't let this situation get your down, they still have big usages. Try jeweled cases. 
The jeweled cases are excellent protectors of your favorite iPhone 4 and look fashionable, attractive and trendy. They are all around In the market online or not, but generally jeweled cases can cost more than you should pay for a piece of plastic that covers a phone. So, why not pick your favorite jewelry piece and make one jeweled case for yourself? As making your own jeweled iPhone case will prove to be cheaper while letting your personality customize your case.

Here is a brief introduction of DIY jeweled iphone cases.
1. Shop for a plain iPhone case. You could find plastic and silicon cases, choose the base color you prefer.
2. Create your desired design on paper through your wildest imagination, or by simply refering to online sources. Everything is possible with a creative mind and your hands. This will serve as your blueprint.
3. Buy gems, rhinestones, sequins, ambers, colored glazes, or anything you need at your local craft store or online. These come in many shapes, colors and sizes. You could also purchase stuff from our online shop gofavor.com or just use your former broken jewelry as material.
4. Glue each individual jewel on the case using craft glue following your blueprint. Use pliers to place the gems for preciseness. You could begin with simple pattern if you think you’re not crafty enough for the first time.
5. Let the jeweled iPhone case dry completely before putting it on your iPhone.